- Concrete Overlays Home
- Get the Look - Interior Overlay Pictures
- When to Use a Polymer Overlay
- Comparison Chart of Overlay Systems: Which is best for your project?
- Five Factors to Consider when Choosing a Resurfacing System
- Concrete Overlay Reviews
- Types of Overlays
- Epoxy Coatings
- Microtoppings & Skim Coats
- Self-Leveling Overlays
- Spray-Down Toppings
- Polishable Overlays
- Stamped Concrete Overlays
- Preparing Concrete for Resurfacing
- Concrete Resurfacing
- Reducing Bond Failures Caused by Moisture-Vapor Transmission
- Don't Let Water Vapor Delaminate Your Overlay: How to seal concrete before an overlay
- How-To Tips for Installing Concrete Overlays
- Answers to Common Questions About Concrete Overlays: Advice from expert Chris Sullivan
- How to Add Color to Concrete Overlays
- How to Protect and Maintain Resurfaced Concrete
- Overlay Tools: Seven essential tools for concrete resurfacing
- Related Information
- Concrete Overlay Videos, with Bob Harris
- Decorative Concrete Overlays: A primer of the various overlay types and the decorative possibilities with each
- Vertical Concrete Overlays: Lightweight cement-based overlays mimic stone, brick, and other wall textures
Vapor Barriers for Existing Concrete Slabs
Don't Let Water Vapor Delaminate Your Overlay
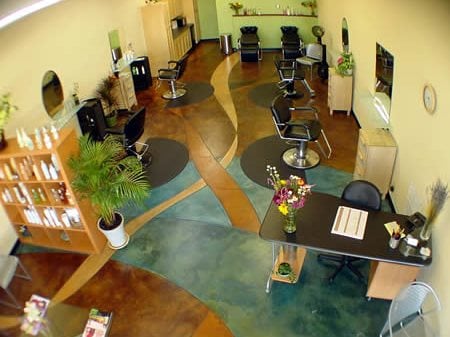
The last thing Dave Pettigrew, owner of Diamond D Concrete, wants is a call back on one of his elaborate floor designs, such as this hair salon.
A perpetual problem with thin overlays is that since they form an impermeable layer on the slab, any water vapor emissions from the underlying slab will be trapped. This vapor can then develop more pressure than the bond strength between the topping and the slab, delaminating the topping. Slabs that lack under-slab vapor barriers will nearly always have some water vapor emission from water below the slab, and newer slabs, even with vapor barriers, will need time to dry out. Overlay manufacturers typically recommend a moisture vapor emissions rate (MVER) of 3 pounds per 1000 square feet in 24 hours (see Reducing Bond Failures Caused by Moisture Vapor Transmission for more on this topic).
Find Products: Vapor Barriers or Overlays & Toppings
Dave Pettigrew of Diamond D Concrete, Capitola, Calif. has developed what he says is sure-fire way to overcome this problem. He uses this method on "any floor I suspect might have vapor emissions and on anything over 20 years old," since older floors seldom had quality vapor barriers. "Anytime there's no vapor barrier you're going to get vapor emissions and that's the beast we all have to deal with—trying to get those vapors blocked. For years I listened to various manufacturers and they all said they had a way, but I was the one who had to go back and repair the floors when they came up."
So Pettigrew took a lesson from the epoxy floor industry. "I realized that the epoxy people had been bonding to concrete way back in the 1940s and 50s before we even had vapor barriers and I thought that if they could get it to bond then I could get it to bond."
From Crown Polymers he purchased some CrownCote vapor barrier, an ultra-low-viscosity epoxy. "I start by grinding the floor to get a nice tooth-surface prep is really important. Then I take the vapor block squeegee it on and it just disappears into the concrete. It really gets into the concrete and takes a bite. I keep putting it on until it builds up a 25 to 35 mil layer on the surface then I back roll it and it self levels." The next day he returns and places an epoxy coating, which he also gets from Crown Polymers. While the epoxy is still wet, he broadcasts sand onto the surface until it no longer wets from the epoxy. The following day he vacuums up the loose sand, leaving the floor looking like a sheet of sandpaper. "The epoxy attaches to the vapor block and once I broadcast the sand into it I have a tooth to attach my overlay whether it's a microtopping or a thin topping."
The initial preparation of the floor is a critical part of the process. "Some floors are so ugly we have to go in first and chase the cracks and fill them with liquid epoxy," he said. "I keep filling the cracks until I get them full before I put the vapor block on. For surface preparation, bead blasting is by far superior, but there's an $1100 minimum to bead blast. So on smaller jobs, we grind the surface to open it up then do an acid etch with muriatic acid. You can also sand blast if you have an open air area."
Today Pettigrew won't even accept a job unless he's allowed to include this as part of the process. "It may seem like a lot of extra work," said Pettigrew, "but anybody who has had to go back and fix one of these floors after they've finished their beautiful artwork overlay knows that two days is nothing compared to the nightmare you have if it starts coming up." The extra cost typically totals about $3.00 per square foot-75 cents for surface prep, $1.00 for the penetrating vapor block, 35 cents for the epoxy, and the rest is labor. Pettigrew has been using this method for several years. "I've never had any problem with an overlay after I've done this."
Author Bill Palmer, ConcreteNetwork.com Columnist
Return to Concrete Overlays
 Rapid Set Skim Coat
Repairs, levels, and smooths concrete for applications.
 Thin Micro-Topping
Produces durable surface to color or stain
 Self Leveling Overlay
Find the overlay to meet your project's needs
 T1000 Stampable Overlay
For use with resurfacing concrete floors and hardscapes.
 Broom Overlay Mix 6000 PSI
Add water and mix - Grey or white
 Flooring & Coating System
Epoxy Flooring System designed for concrete
 Stamped Concrete Overlay
Warm weather and cold weather formulas
 Imprinta Stampable Overlay
2-component system


