- Concrete Overlays Home
- Get the Look - Interior Overlay Pictures
- When to Use a Polymer Overlay
- Comparison Chart of Overlay Systems: Which is best for your project?
- Five Factors to Consider when Choosing a Resurfacing System
- Concrete Overlay Reviews
- Types of Overlays
- Epoxy Coatings
- Microtoppings & Skim Coats
- Self-Leveling Overlays
- Spray-Down Toppings
- Polishable Overlays
- Stamped Concrete Overlays
- Preparing Concrete for Resurfacing
- Concrete Resurfacing
- Reducing Bond Failures Caused by Moisture-Vapor Transmission
- Don't Let Water Vapor Delaminate Your Overlay: How to seal concrete before an overlay
- How-To Tips for Installing Concrete Overlays
- Answers to Common Questions About Concrete Overlays: Advice from expert Chris Sullivan
- How to Add Color to Concrete Overlays
- How to Protect and Maintain Resurfaced Concrete
- Overlay Tools: Seven essential tools for concrete resurfacing
- Related Information
- Concrete Overlay Videos, with Bob Harris
- Decorative Concrete Overlays: A primer of the various overlay types and the decorative possibilities with each
- Vertical Concrete Overlays: Lightweight cement-based overlays mimic stone, brick, and other wall textures
How to Fix Concrete Overlays
Answers to Questions about Concrete OverlaymentsOVERLAYS OVER WOOD SURFACES
Question:
We have experience resurfacing concrete with microtoppings and polymer overlays, and we are now just starting to do this process over wood-either interior floors or upper-level patios that do not have enough clearance for concrete. What is the best practice for this process?
We currently staple down a vapor barrier, screw down metal lath, and then incorporate some fiber mesh into an underlay material about a 1/4 inch thick. After this sets up, we apply the microtopping or stamp mix to the required depth to take the stamp imprint and then spray apply antiquing color, acid stain or dye. This is followed by application of a high-traffic water-based sealer.
We have had two overlay failures; one cracked and the other leaked. What could be the problem? Also, can you recommend dependable products to use for the vapor barrier and the metal lath?
Answer:
From what you wrote, I have no issues with the surface preparation and systems you are using. I typically tell people to prep a wood or non-concrete surface as you would for tile: place a mortar bed with lath (as you are doing) or use cement board (such as HardieBacker) with seams taped and mudded. For the rest of the answer, see Overlays and Wood Surfaces.
WHAT TYPE OF POOL DECK OVERLAY WILL STAY COOL?
Question:
We need a product to resurface a concrete pool deck in a community complex in Las Vegas. The summer heat is unbearable, and the concrete gets so hot you can't walk on it. I have heard about a product called Kool Deck, but pool stores tell me it's really just a paint. Can you recommend a product for our needs?
Answer:
Those pool stores are wrong. Keystone Kool Deck from Mortex Mfg. is a not a paint. It's a spray-applied cement-polymer overlay available in light colors that will help to reflect the heat. For more information and the rest of this answer, see What Type of Pool Deck Will Stay Cool?.
PLACING OVERLAYS OVER TILE FLOORS
Question:
What is the best self-leveling concrete overlay to apply over ceramic or clay tiles? Do the tiles need to be treated before applying the overlay?
Answer:
This will depend on the type of tiles you are going over. Glazed tiles usually require a light sanding to "rough up" the surface. The glaze can often act as bond breaker and is a difficult surface for anything to adhere to. Porous unglazed clay or stone tiles, on the other hand, require no additional preparation. For the complete answer, see Placing Overlays Over Tile Floors.
HOW TO FIX SHRINKAGE CRACKING IN CONCRETE OVERLAYS
Question:
Why did this integrally colored stampable overlay crack so drastically? It was applied at 8 a.m. on a hot July day. The air temperature was 85 F, but the surface temperature was over 100 F.
Answer:
Even though stampable overlays are polymer-modified, they are still concrete mixtures and exhibit all the characteristics of concrete, including shrinkage cracking if care is not taken during installation. The dry, hot weather and high surface temperature, in conjunction with the thin cross section of the overlay, created a situation where the little moisture present in the overlay evaporated too quickly, resulting in shrinkage cracks.
Here are the key factors to remember when working with overlays in hot conditions:
- The temperature of the surface to receive the overlay is as important as the air temperature. Only apply overlays when [air and surface?] temperatures range from 50 F to 90 F. If in doubt, hold off until temperatures moderate.
- Avoid application in direct sunlight or excessive wind.
- To slow hydration, add approved set-retarding agents to the overlay mix or apply evaporative-control agents to the surface.
- Cure the overlay with plastic or an approved curing compound.
Not all overlays are the same. Some products contain water reducers or hydration control admixtures to help control shrinkage cracking. Check with the manufacturer of the product you're using.
FIXING WHITE STREAKS IN CONCRETE OVERLAYS
Question:
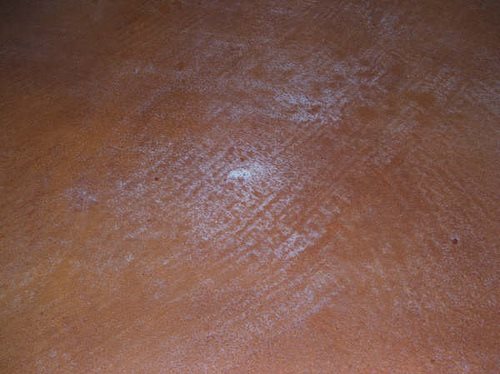
I used an 18%-solids water-based acrylic sealer on an interior stained microtopping. Certain areas of the floor remained white and hazy, as can be seen in the picture. Why did this happen, and how do I fix it?
Answer:
When dealing with sealer-related problems, the trigger mechanism often revolves around one or more of the following factors: moisture, temperature, surface contamination, and application method. In this case, the long, thin streaks of white indicate over-application of the sealer with a roller. If the roller is overloaded with sealer, it tends to drag large amounts across the surface in streaks and ribbons. These thicker streaks of sealer skin over on the top surface, preventing the sealer from fully curing. Instead of turning clear, the sealer remains white and milky in appearance. Another factor at play is the surface texture of the overlay. If the surface has differences in elevation, sealer tends to puddle in the valleys. It will also collect in cracks and joints. These areas are more susceptible to this white hazing or milkiness.
With water-based sealers, fixing this situation can be as easy as applying a thin solvent bath or as involved as stripping the entire area, depending on the sealer product used. A simple solvent (xylene, acetone, or methyl ethyl ketone) wiped over the surface can loosen the sealer, allowing the underlying material to cure and turn clear. If this method doesn't work, or destroys the sealer, you'll need to use a chemical stripper to remove the affected areas. (Be sure to test the stripper on a small section first to determine the effect.) Once the entire area is stripped and cleaned, reapply the sealer, taking care not to overload the roller.
CAUSE OF SHADOWING THROUGH AN OVERLAY
-
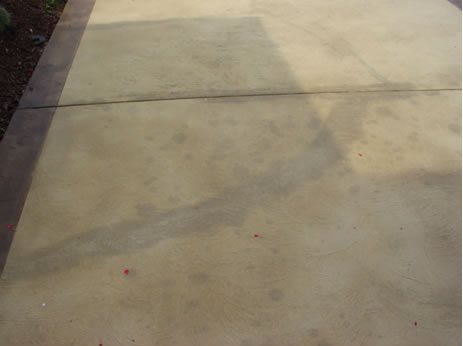
We did a "rough trowel" overlay on a driveway in Pennsylvania, and three weeks after the job was complete dark marks appeared. At first, they would come and go, but now they are permanent. When the homeowner washes his car, the water that gets on the driveway surface also starts to darken the overlay. We think that moisture from underneath the overlay and penetrating from the top in areas where the overlay and sealer have chipped off is causing the darkening. We are now looking for a fix to this problem.
-
This is what is known as "shadowing." Either contamination or moisture is causing a shadow or darkening to show through the overlay. The area where it is darker could be the shadowing of a crack, oil stain or repair material. Based on the photo, the cause appears to be moisture, especially in the areas around the control joint.
To fix the problem, you need to find where the moisture is getting under the overlay and stop its entry to prevent the shadowing from getting worse over time. The joints are easy - just caulk them with a flexible polyurethane caulk. Also, make sure to caulk all edges and places where water can migrate between the overlay and concrete substrate. The main areas are a bit trickier. You will need to be grind down the overlay, treat the concrete with a penetrating waterproofing sealer, and then reapply the overlay.
Question:
Answer:
COLOR CHANGES ON A BLACK CONCRETE OVERLAY
-
We installed an overlay and applied a water-based black dye and an acrylic sealer. Now it's three months later and the customer would like us to stain the floor. Do we have to apply another overlay, or can we stain the dye?
-
It really depends on what new color your clients want. Changing from black to any other color is almost impossible, because black will overpower all other stain colors. You can try a tinted sealer and see what you get, but the black tone will always be there.
Question:
Answer:
USING MICROTOPPINGS AND STENCILS TO REJUVENATE UGLY CONCRETE
-
I have a poured concrete walkway that is sound but worn and ugly. I have gotten quotes for overlaying it with brick or flagstone, but both will raise the level of the walkway too high (people will trip) and they cost too much. What can you suggest for a thin overlay material that looks like brick or flagstone, will not crack, will wear well, won't be slippery, and I can install myself without exotic tools. (I'm a handyman, but not a professional builder.) I am located in the Northeast, so the concrete is exposed to freezing temperatures and snow shoveling.
-
Even if you're a do-it-yourselfer, I recommend that decorative concrete applications be left to the professionals. But since the existing concrete is in sound condition, you might consider overlaying the surface with a microtopping and using a stencil to create the brick or flagstone pattern. The overlay will be about 1/8 inch thick and can stand up to freeze/thaw conditions if applied and maintained properly.
The application is pretty straightforward, and you have dozens of overlay colors and stencil patterns to choose from. Proper surface preparation and making sure no water can get under the overlay are the most critical factors in ensuring long-term performance. For proper installation instructions, refer to the guidelines provided with the product you select.
More information is available on concrete overlays and concrete stenciling.
Question:
Answer:
LEVELING CONCRETE FLOORS WITH A COLORED OVERLAY
-
My wife and I are building a home on St. Croix, in the U.S. Virgin Islands. The floor was poured some time ago, and is rough and uneven. We plan on mixing concrete slurry to level the floor. Is there a pigment we could mix in with it to color the floor? Also, the exterior walls of the home will be plastered in a couple of weeks. Is there anything you can recommend mixing in with the plaster that would color and seal? The home is on a knoll about half a mile away from the sea.
-
There are multiple flooring products that can be used to even out a rough or unlevel floor. A self-leveling overlay is the most common, such as Increte Level Top, Rapid Set Concrete Leveler® and Duraamen Param 5500. These overlays go down at thicknesses ranging from 1/4 to 3/4 inch, and they self level with very little troweling or spreading required. However, there is an art and level of experience required to get a nice uniform finish, which will be especially important if this is going to be your final surface. Most self-leveling products will accept inorganic (iron oxide) pigments at low dosings. Consult the manufacturer of the specific product you are using for coloring guidelines.
I would stay away from mixing up your own concrete slurry. Unless you plan on modifying it with polymer, it will become brittle and crack. If you do not want to go the self-leveling route, use a microtopping product - a thinner overlay applied at a 1/16- to 1/8-inch thickness. Examples include Butterfield Color MT Resurfacer and Brickform Micro-Topping. Depending on the type of finish desired, you can use a trowel, squeegee or roller to apply a microtopping. Most products can be colored integrally to almost any color desired.
As for coloring the plaster, you can use the same iron oxide pigments mentioned above to color any cement-based material, including plaster and stucco. But these pigments will do nothing in regard to sealing, so a separate sealer will need to be used as a finish coat. My advice is to use a pre-colored synthetic plaster or stucco product, such as Synergy StuccoBase Premix. These products are best suited for exterior walls.
Question:
Answer:
TO OVERLAY OR NOT TO OVERLAY
-
I am getting ready to resurface concrete in front of two double garage entries. I have been told to have the concrete resurfaced with an acrylic overlay. But I have an estimate from a contractor to resurface using a cement-based overlay. I don't know which type of overlay to use or if an overlay is even the best remedy in this situation. Please help.
-
The first question needs to be: What is the end result you are trying to achieve? An overlay will work in this situation, but so could other less costly methods. I am going to assume that you have settled on using an overlay because the existing driveway is damaged or has flaws that need to be covered. But if you only desire to dress up the surface, many different types of stains and solid-color toppings are available that will do just that. The important thing to remember is that these toppings just change the color of the existing concrete and will not correct the profile or hide damage.
If the concrete needs a new surface, a thin-section overlay, often called a "microtopping," is a good choice. As with any overlay, surface preparation is the most important factor. A clean, properly profiled surface is critical for good adhesion. Other important factors include selecting the right material for the job and hiring an experienced applicator. Not all overlays are designed for exterior use. Ask to see a spec sheet for the product being applied, and feel free to contact the manufacturer to make sure the material will work in this scenario. No matter which direction you go, have your applicator provide references of previous jobs and a written warranty. Also ask to have all maintenance procedures and life-time performance expectations put down in writing before moving forward. A good applicator using a quality overlay material can provide a new surface that will last for decades.
Question:
Answer:
CONCRETE COLORING TECHNIQUES FOR TINTED OVERLAYS
-
I have not had much success tinting overlays on site with tint packs. What is the best way to tint overlays to ensure color consistency?
-
The same basic principles apply when integrally coloring an overlay as when integrally coloring concrete. (See The Concrete Network article Understanding Colored Concrete Common Problems, Why They Occur, and How to Avoid and Fix Them.) The big difference is that the margin of error is much smaller when coloring a few gallons of overlayment vs. coloring a large batch of concrete. The biggest factors to consider are batch size and batch-to-batch consistency. The larger the batch, the lower the chance for color inconsistency.
For the best results, tint or color the liquid component of the overlay mixture (water or polymer) in one large container. If you do not have a large enough container, "box" the liquid by pouring it back and forth between smaller containers until you feel you have mixed it multiple times and have achieved a consistent color. You can then measure out the colored liquid with a graduated measuring container to ensure you get the same amount of colored liquid in each batch. Here's a tip: Cut a small hole in the side of your measuring container at the top of the liquid level to be sure you get the same amount in each batch.
Another important consideration is to use a reputable tint manufacturer that uses a batch number system, with retained material samples kept from each batch, so you can go have the color checked if you have a color issue. Remember to write down those batch numbers just in case!
Question:
Answer:
FIXING CRACKS BEFORE OVERLAY APPLICATION
-
What is the best method for fixing cracks in concrete prior to applying a decorative overlay?
-
The term "fixing cracks" is a bit misleading since there is no way to "fix" cracks in concrete, only fill them. The proper term to use when treating cracks prior to placement of a decorative overlay is "bridging." This is accomplished by filling or covering the crack with a rigid material so it becomes flush or slightly higher in elevation than the surrounding surface. (Avoid soft, flexible crack fillers.)
To prepare the crack for repair, use a crack-chaser diamond blade to remove any loose concrete and to straighten out the crack as much as possible. The repair material filling or covering the crack needs to bond tenaciously to the concrete surface can be applied so that it gradually feathers down to surface level. The crack filler also needs to bond well with the overlay, so it needs to have a rough profile. The three most common methods for bridging cracks prior to applying a decorative overlay are:
- Rigid Epoxy Systems - These are usually two-part epoxies available in self-mixing cartridges or for mixing onsite. You apply them using an injection gun or putty knife to fill the crack to overflowing, and then you feather out the epoxy on either side of the crack anywhere from 2 to 5 inches (see photo). Placing mesh tape into the wet epoxy provides additional reinforcement. Once the epoxy begins to set, course sand is cast onto it to provide a rough bonding surface for the overlay.
- Cement-Based Systems - Polymer-modified cement-based repair mortars are mixed onsite and applied with a trowel or putty knife (again, using the feathering technique). Multiple thin applications are usually required to avoid shrinkage cracking. To provide a good bonding surface for the overlay, roughen the surface by scratching it with a broom or trowel as it begins to set.
- Crack Suppression Mats - These have been used successfully for years in the tile industry. Roll out the mat to cover the crack by 5 inches on either side (or cover the entire surface if cracking is extensive), and adhere the mat to the surface using a bonding primer or glue. This type of crack suppression method is also a great way to cover seams when applying decorative overlays over wood and other non-concrete surfaces.
No matter the type of crack treatment used, assuring that the crack is properly bridged is critical in eliminating shadowing and show-through of the original crack in your newly applied overlay.
Question:
Answer:
SMOOTH-FINISH OVERLAYS INSTALLED OVER BROOM-FINISHED CONCRETE
-
I have broom-finished concrete and want to acid stain it. All the acid-stained floors I have seen, and like, are smooth with hard-troweled finishes. Is there anything I can do to change my broom finish to a smooth finish so the stain will look better?
-
The use of a microtopping, or thin overlay, is the solution. These ultra-thin polymer-modified cement-based overlays are easy to apply and most will take a stain. Make sure to check with the overlay manufacturer to ensure that their product is compatible with stain. Preparing a test sample prior to starting the project is always recommended.
Microtoppings can be applied with trowels, squeegees, or even hopper guns, depending on the type of finish desired. Smooth finishes are best achieved with a squeegee or trowel. Most microtoppings cure in 24 hours and can be stained any time after the initial 24-hour cure time. With microtoppings, you can use different finishing techniques to increase the amount of marbling and create more variegation when the stain is applied. These stained overlay surfaces will need to be sealed and maintained, just like a regular stained concrete surface.
Question:
Answer:
DON'T USE OVERLAYS TO FIX BAD CONCRETE
-
Our condominium board plans to have a decorative concrete overlay applied to our 35- year-old concrete walkways, which have existing cracks and many unlevel areas. That concerns some of us. The board members want to apply a 1/8- to 3/8-inch overlay, but that doesn't seem to be thick enough. Please advise. Our location is right on the Gulf of Mexico, so the walks are exposed to a coastal environment.
-
I am not worried about the environment - decorative concrete overlays can handle Gulf Coast conditions. However, the minimum thickness of the overlay should be ¼ inch. Because overlay materials are polymer modified, they are designed to go down thin and still maintain strength.
I am more concerned about the cracks and uneven areas in the existing walkways. Overlays are only as good as the subbase they are applied to. They are not intended to fix poor concrete, but instead are meant to give a new aesthetic look to concrete that's in good shape. Put these overlays on cracked concrete, and you will get a cracked overlay. (See When to Use a Polymer Overlay.)
Another bit of advice: If your board is looking at an overlay for cost savings, they are going down the wrong road. A stampable overlay applied by a reputable installer will cost about as much as new stamped concrete. The reason to use an overlay is if the concrete in place is in good shape and or it is located in an area that's not easy to access, resulting in damage to other structures or surrounding landscaping during the removal process.The concrete walkways you describe do not sound like good candidates for an overlay. Their life span of 35 years is a good one, and it might be best to start over.
Question:
Answer:
MOISTURE CAUSES MICROTOPPING FAILURE
-
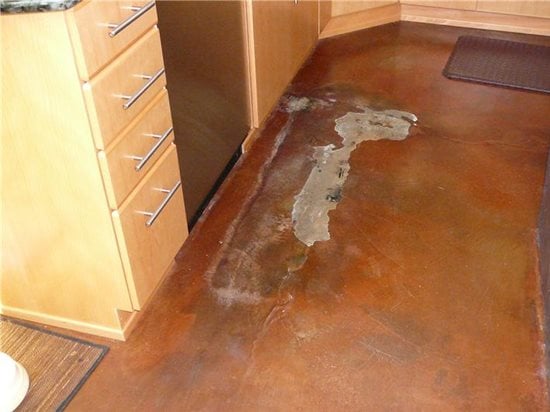
A new slab was doweled and pinned to an existing concrete foundation slab to make the footprint larger. The existing slab is 50 years old with an intact vapor barrier. A concrete stain contractor came in and put down an acrylic-modified cement microtopping over the entire new slab, then stained and sealed it. There was no noticeable moisture problem during overlay installation. Now the new area is showing signs of moisture emission, which is causing the microtopping to bubble and fail, as you can see in the photo. The owner of the slab is very frustrated. There also seems to be efflorescence going on in his garage on the new stem walls. Obviously there's a moisture problem underneath the slab, but it only wicks up at the dowelled areas. Was the microtopping the correct product for the application? Do you have any suggestions to repair this problem?
-
I agree that moisture vapor transfer (MVT) is the probable cause of the delamination. The dark area surrounding the delaminated area as well as the white efflorescence on the concrete in those areas indicates moisture. Efflorescence can't occur without water, so that's a "smoking gun" that some water is moving through the slab. The combination of the pressure created by the moisture drive, along with the white salt residue (efflorescence), which acts as a bond breaker, is enough to lift or delaminate most coatings and overlays. Moisture will tend to concentrate and migrate through any joint, crack or sawcut, so the fact that the efflorescence and delamination is worse around the joint does not surprise me. The overlay is a high-strength acrylic polymer mixed with cement and sand. It creates a very durable and rigid thin topping that resists scratches and abrasion. However, it does not have good flexural strength, so when it is subject to pressure and force, it will crack and delaminate before it "bends," so to speak.
Repair of the existing floor involves removing the overlay in the areas where moisture drive is present. The base concrete should then be treated with a nonbreathable, waterproof coating with a crack-suppression membrane embedded into it. This will act as a barrier to stop moisture movement and provide a stable substrate for the microtopping. The microtopping system can then be reapplied, stained and sealed.
-
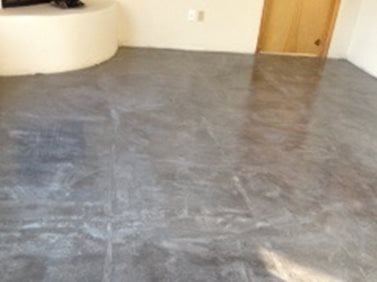
I just had a decorative concrete job done in all the main living areas of my home. The contractor placed a micro-thin overlay of concrete over an existing slab and added integral color. I was promised a uniform look, but the final result is not what I expected. I can see lighter lines in the gray concrete, and there are also lighter marks that look like milk has sloshed all over the gray. I don't like it, and I asked the contractor to remove the lines and the spill marks. When they attempted to, they accidentally added swirl marks by trying to sand out the color irregularities. What would cause these problems, and what can be done to remedy to them?
-
There are a few things going on with your floor. The “lighter lines” as you describe them are known as “ghosting” or “shadowing” lines from the substrate. Because of the thin cross section of the microtopping, any profile or porosity difference on the substrate will create these shadow lines. My guess is that the concrete substrate had some type of tile on it prior to the microtopping or the concrete was sawcut into the square pattern you see shadowing through. Industry standard in this situation is to apply a crack-suppression membrane or high-build primer and bonder with a scratch coat over the floor to produce an impermeable layer that will hide any ghosting or shadowing. It’s hard to tell from your photos, but I am guessing the spill marks are either the sealer blushing or more of the same shadowing from some type of contamination in the base concrete.
Swirl marks are common when a microtopping is sanded too aggressively -- a good example of a repair making a small problem a bigger problem. These marks really show up when a sealer is applied.
In regard to a remedy, I would recommend doing the following if you want to stay with the microtopping:
- Sand or grind the top to expose fresh microtopping.
- Apply a coat of an epoxy primer and bonder to prevent shadowing.
- Apply a scratch coat of microtopping directly into the primer/bonder when it is still wet and tacky.
- Let the scratch coat dry 24 hours.
- Apply a finish coat of integrally colored microtopping.
- Let the finish coat cure 24 hours, and then seal the floor.
Question:
Answer:
SHADOWING THROUGH A MICROTOPPING
Question:
Answer:
View all decorative concrete Q&A topics
Find Interior Concrete Overlay Products
Find Concrete Resurfacing Products
 Rapid Set Skim Coat
Repairs, levels, and smooths concrete for applications.
 Thin Micro-Topping
Produces durable surface to color or stain
 Self Leveling Overlay
Find the overlay to meet your project's needs
 T1000 Stampable Overlay
For use with resurfacing concrete floors and hardscapes.
 Broom Overlay Mix 6000 PSI
Add water and mix - Grey or white
 Flooring & Coating System
Epoxy Flooring System designed for concrete
 Stamped Concrete Overlay
Warm weather and cold weather formulas
 Imprinta Stampable Overlay
2-component system
